Quicken is used for various financial activities such as budgeting, monitoring expenses, track records of bank accounts such as checking, saving, etc. and much more. It also helps you to download bank transactions in three ways Web Connect, Express Web Connect, and Direct Connect. Three of the connection methods are easy to use and also explained each of them separately below. You can switch between the connection methods anytime such as Express Web Connect to Direct Connect. In the same way, we’re going to discuss how to switch from Web Connect to Express Web Connect in Quicken.
Reasons to switch from one connection method to others in Quicken
1. Your bank doesn’t support Web connect as a connection method no longer.
2. You wish to download bank transactions automatically in Quicken
Different types of Connection Methods in Quicken (Windows)
- Express Web Connect: It helps to download transactions automatically from financial institutions in Quicken.
- Direct Connect: It also helps to download financial information from bank and additionally you can pay your bills and transfer money with the help of this method. Fees may apply from the bank.
- Web Connect: With the help of this method you can export financial transactions from the bank’s website and import them into Quicken.
Basic tasks to perform before switching the connection method in Quicken
- Create a Backup
We recommend creating a backup before switching the connection methods in Quicken. It’ll help you prevent any loss such as if there would be any fall back in between the process so you can get back to the same point where you started.
To Backup:
1. Open Quicken
2. Go to File > Backup and Restore > Back up Quicken File…
3. Click on Backup Now
- Don’t allow Quicken to add banking transactions automatically
This feature helps you to prevent duplicate transactions in the accounts. Also, it always put transactions under the Downloaded Transactions section from which you can accept the transactions that you want and delete the rest.
To enable this feature:
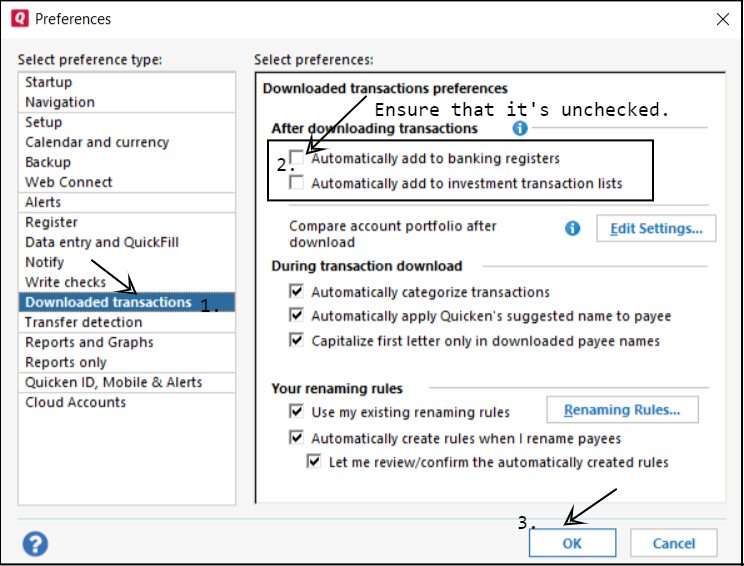
1. Go to Edit > Preferences
2. Click on Downloaded Transactions
3. Ensure that Automatically add to banking registers is unchecked (See an image below)
4. Then click OK
Quick Note: If you want our experts to help you in this situation, you can dial our Tollfree or leave us your message.
2 Simple Steps to Fix Web Connect to Express Web Connect in Quicken
Important: We’re assuming that you already have an account in Quicken with Web Connect
Step 1: Deactivate the Bank Account
- Go to Tools > Account List (Ctrl+A)
- Click on Edit for the account that causing this error
- Select the Online Services tab
- Now click on Deactivate button
- Click on Yes to deactivate the services
- Then click OK and Done
Step 2: Reactivate the Account using Express Web Connect
- Go to Tools > Add Account…
- Choose the type of account such as Checking, Savings, etc.
- Click on Advanced Setup (bottom left side corner)
- Now enter the name of your financial institution and click Next
- Make sure Express Web Connect is selected as a connection method and click Next
- Now enter the Username and Password provided by your bank and click Connect
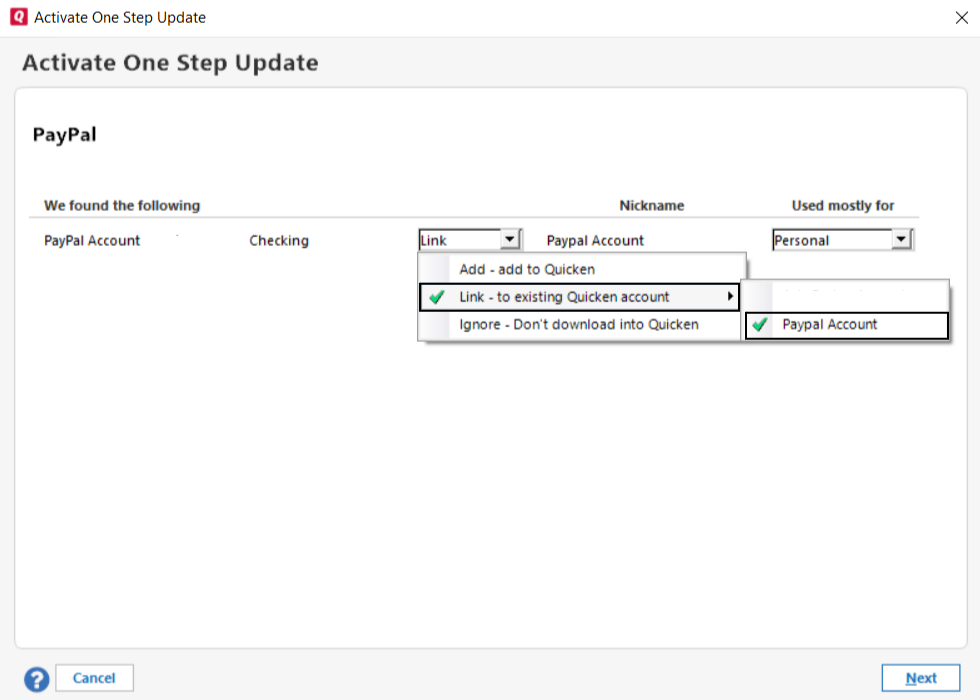
- Now Quicken may take some time to look up your accounts
- Once Quicken shows you the list of accounts, LINK the account to the existing one that you deactivated(See an image below)
After following all the above steps you can easily move from Web Connect to Express Connect in Quicken for Windows. In case, you face any help you can speak with our experts or leave us your message