QuickBooks Error OL-209 occurs when you’re updating your accounts to download the new bank transactions into QuickBooks software. The reason for error code OL-209 could be the temporary bank server outage or company file having data integrity issues.
In this post, we’ll discuss its causes and get them fixed permanently. Also, the occurrence of this error code because your bank may need you to confirm your identity in order to access online services in QuickBooks desktop.
Quick Note: You may also face QuickBooks Error OL-202, OL-205
Causes for QuickBooks Error Code OL-209
- Bank website or servers are on the maintenance mode
- Company file having data integrity issues
- QuickBooks desktop needs to be updated
Things to do before fixing this error code
A. Make a backup for your company files
1. Open QuickBooks Desktop
2. Go to File > Back Up Company > Create Local Backup
3. Now follow onscreen instructions to create a backup
B. Update QuickBooks Desktop
- Open QuickBooks Desktop
- Go to Help > Update QuickBooks Desktop…
- Select Update Now tab from the top and click Get Updates
- Once Update is complete, click on Close
Quick Note: Process to fix this error code may complex, you can speak with our experts for the quick resolution. Leave us your message and we’ll contact you.
6 Simple Steps to Fix QuickBooks Error OL-209
Step 1: Contact your bank or financial institution
We recommend you, contact your financial institution first because there could be a possibility that they’re making some changes onto their server(s) or website(s) and that might be the reason for having this trouble in QuickBooks desktop.
If they’re running with some issues please wait for 24-48 hours or if they’re not please proceed further with the below troubleshooting steps.
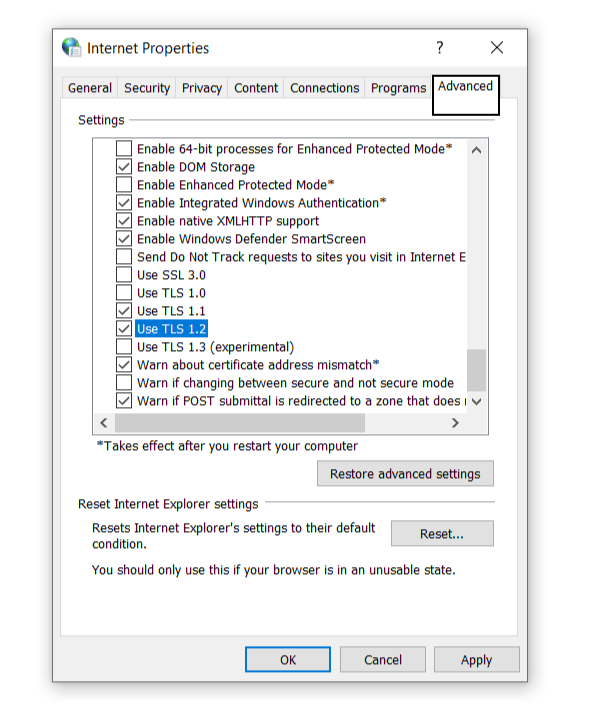
Step 2: Enable Security Protocol TLS 1.2
- Press Windows+R keys together to open Run command
- Then type Control and click OK
- Select Network and Internet > Internet Options
- Click on the Advanced tab
- Scroll the cursor to the Security section
- Make sure Use TLS 1.2 is checked and Use TLS 1.0 is unchecked
- Now click Apply and OK
Step 3: Create a Test Company File
The purpose to create a new test file is to find if the problem is with your bank or a company file. To create a new company file follow the below steps:
- Go to File > New Company
- Click Start Setup and Skip
- Now enter the required information and click Create Company
- QuickBooks may take some time for creating a new company file
- Once You’re All Set! Click on Start Working
- Now add your bank account in the test file
If you can download the bank transactions
After creating a new test file if you can download the bank transactions that means that your primary company file may have some issues, please contact our experts in order to do more troubleshooting.
If you can’t download the bank transactions
After creating a new test file if the same issue still exists that means your bank needs your confirmation to verify your identity or they’re making some changes on their server(s) or website(s). In that situation, you need to contact your bank and speak with their QuickBooks experts team.
After following the above 3 steps if you’re still facing QuickBooks error code OL-209, please proceed further with the below-troubleshooting steps.
Step 4: Create a New Account and Merge it
- Open QuickBooks and login to the company file
- Go to List > Chart of Accounts (Ctrl+A)
- Then make a right-click on the questioned account and click Edit Account
- At the end of the Account name put (.old). For Example: If your account name is Checking now rename it as Checking.old
- Then Deactivate the Bank Feeds
- Now click on Save & Close
Create a New Account
- Click on the Account tab (to the bottom left side) and select New
- Choose the type of an account and click Continue
- Give the same name as your existing account.
- Then click Save & Close
- Now go back to the Chart of Account List
- Then make a right-click on the account that has .old at the end and select Edit Account
- Remove .old from the account name and click Save and Close
- Then click on Yes to merge the account
- Now reactivate the bank feeds
Step 5: Deactivate and Reactivate Bank Feeds
Deactivate Bank Feed
- Go to List > Chart of Accounts (CTRL+A)
- Right-click on the account(s) from the list that causing this error code to you and select Edit Account
- Click on Bank Settings
- Select Deactivate All Online Services
- Click OK
- Select Save and Close
Reactivate Bank Feed
- Go to List > Chart of Accounts (CTRL+A)
- Right-click on the account(s) from the list that causing this error code to you and select Edit Account
- Click on Set Up Bank Feeds… and then Yes to close all open QuickBooks windows
- Next screen prompts you to enter your bank(s) name and click Continue
- Now on the next windows enter your bank Username and Password and click Connect
- QuickBooks will take some time to pull up your bank account(s), once it found them LINK the account(s) with a respective existing account
- Click Next
Step 6: Run Verify and Rebuild Utilities
Run Verify Utilities
- Open QuickBooks Desktop
- Go to File > Utilities > Verify Data
- Click OK to close all open windows
- If QuickBooks doesn’t detect any problem with your data click OK
- If QuickBooks found some issues with your data click on Rebuild
Run Rebuild Utilities
- Go to File > Utilities > Rebuild Data
- Click OK and then Save to create a backup
- Once the rebuild has completed click on View Results
- If you found 0 issues please proceed further with the below steps
- If you found any issues with your data, you can speak with our experts.
After following all the above steps you’ll no longer face QuickBooks error code OL-209 but in case it still exists please speak with our experts. Drop your queries and let us contact you
Related Posts