QuickBooks allows you to use company files on multiple computers and give various users the right to work on a single company file. An authorized user can work on a file with the help of QuickBooks Database Server Manager. Moreover, if you have the Database Server Manager installed, you don’t have to worry about manual company file sync as the software takes care of everything.
In this blog, we’ll guide you on how to share your QuickBooks company file with your team members and set up a reliable multi-user network for QuickBooks. So, if you were planning to do so on your own, then we suggest you should go through this blog first.
Installing Database Server Manager
By default, QuickBooks installs QuickBooks Database Server Manager on your computer. Before proceeding ahead, just check your QuickBooks installation directory for the same. If the Database Server Manager is not installed, then just follow the below-mentioned steps:
- Download QuickBooks Tools Hub and go to your downloads by pressing CTRL+J
- Under your downloads list click on QuickBooksToolsHub.exe
- Click Yes to allow this app to make changes
- Now click on Next to install it and then click Yes again for accepting the license agreement
- Click on Next and then Install (It may take some time)
- Once the installation is complete click on Finish
- Now open QuickBooks Tool Hub (Icon will be available on your desktop)
- Under Network Issues tab click on QuickBooks Database Server Manager
Once you install the tool, don’t forget to give all the users permission to access the company folders. By default, QuickBooks database server manager creates a unique user for each installation.

Using Database Server Manager for Providing Multi-user Access
Once the installation is complete and you’ve provided necessary user permissions, follow the below-mentioned steps:
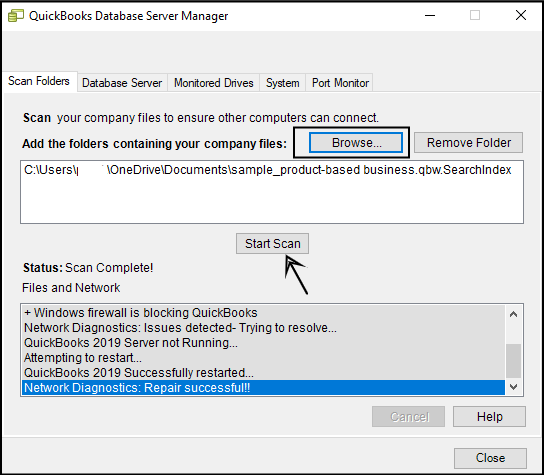
Step 1: Scan the Folders Where Your Company Files are Stored
When you open the Database Server Manager for the first time, you will be asked to scan for company files. You will have to scan the folders only once. Here is how to do the same:
- Head over to the ‘Scan Folders’ tab.
- Click on Browse and select the folder that stores your company file (.QBW)
- Click on ‘OK’ and ‘Start Scan’
Once the scanning ends, you can see the folder in the ‘QuickBooks company files found’ segment. The files in the segment are now ready to be used from other computers in the network.
Step 2: Monitor storage drives
Once you have scanned the folders successfully, you will be able to see the drives in the ‘Monitored Drives’ tab. Click on a drive to monitor the drives periodically. This will eliminate the need for rescanning if you move company files from their original folder. For doing the same, you just need to follow the following steps:
- Head over to the ‘Monitored Drives’ tab.
- Click on the checkbox corresponding to the drive that stores your company files.
Things to Keep in Mind
You might need the Database Server Manager for several routine tasks associated with multi-user access. Keep the following tabs and their uses in mind for smooth functioning.
- System Tab: Check where Database Server Manager is installed on your computer
- Database Server: Check real-time connection status and see who all connected and are using the company file
Troubleshooting Common Database Server Errors
If you are experiencing an issue while using the Database Server Manager, then the best way to deal with the same is to restart the tool. Follow the steps to restart the Database Server manager:
A. If both QuickBooks Desktop & Database Server Manager are Installed on Server
- Open QuickBooks Desktop
- Go to File Menu and click on ‘Open or Restore Company’
- Select ‘Open a Company File’, choose your file and click on next
- Make sure to check the ‘open file in multi-user mode’ option and click on open
- Log in to the file using your credentials
- Now go to the ‘File’ menu and close the company file. This will close your company file on the server computer.
- Open QuickBooks Database Server Manager
- Let the tool start and you will see your file up and running.
B. If only Database Server Manager is installed on your Server
- Click on Start Menu
- Open Control Panel
- Head over to Administrative Tools
- Click on Services option from the list
Find ‘QuickBooksDBXX’ (XX represents the year of database server manager version release) service. Right-click on it and select ‘Restart’
Your Database Server Manager should restart automatically. If it still doesn’t restart, then we recommend following the steps once again.
Wrapping Up
Database Server Manager is a really effective tool for multi-user file access on QuickBooks. If you run a small business or company with various stakeholders, then using the tool can help you manage operations efficiently. I hope you are now well informed on how to use Database Server Manager for configuring up your own multi-user company files.
After following all the above steps you can easily download and install QuickBooks desktop database server manager on your computer. If you need any assistance with QuickBooks desktop, please speak with our experts. Call Us 1-877-353-8076 or leave us your message.
Related Links
1. QuickBooks Install Diagnostic Tool
2. QuickBooks Desktop File Doctor